A few years ago (just before Fender released the Squier VM Bass VI) I converted a cheap copy of a Gibson EB-3 into a short-scale (30" / 762mm) 6-string bass. I wrote this about the process.
I've been really pleased with the instrument, and have used it for various overdubs on the recently completed Zaardvark album alongside Andy's Squier VI, but since putting it together I've had a nagging curiosity about how a longer-scale (34") version of this instrument would work. The few commercially available Bass VI-type instruments (Fender, Eastwood, Burns, Schecter, Revelation etc) are all short-scale, but I don't know whether that's due to ergonomic considerations, or because of the underlying physics. I did wonder if perhaps strings that long would start colliding with one another when vibrating if six were squeezed together onto a neck designed for four.
With this in mind I thought initially that it a 5-string bass would make a better candidate for conversion, but I had a chat with Andy about it, and he reckoned that the tight string spacing was part of the unique appeal of the Bass VI, so I decided that I would at least try to convert a 4-string neck. It would have to be at least as wide at the nut as the Fender VI (42mm), so if I was going to stick with Fender-derived models I'd be looking for a Precision bass rather than a Jazz as my test subject, and given that I wasn't sure I'd end up with a usable instrument it would have to be very inexpensive. I started watching eBay and Gumtree for something suitable.
In the meantime, I started thinking about the work that would be required. I remembered this thread from the Offset Guitars forum, where user rainbowdoom showed how he'd re-shaped the headstock of a Fender Bronco bass as part of a VI conversion. The re-shaping was necessary in order to get the six guitar-sized tuners into positions where the strings wouldn't be pulled through the nut at a crazy angle - Shortscale.org user Matthew K gives a good explaination of the problem in this thread, and also links to this handy graphic:
With this in mind, I found pdf scale drawings of various Fender guitar headstocks, and started overlaying them on a Precision Bass head to see which shape would be easiest to achieve. The closest fit was a pre-CBS Strat headstock, shown below in blue.
As you can see, whilst there is a surplus of wood available in the P-Bass headstock, not all of it is where I would like it to be. I figured that if I cut off a section of the head (shown in green) and re-attached it closer to the bridge there should be enough timber in the right places.
According to Photoshop, it should just about work. There would still be a small area on the treble side of the head where there wouldn't be enough wood to follow the Strat shape faithfully (indicated below), but this section would be contoured at the rear, so attaching additional wood wouldn't be an option.
What I eventually ended up with was this:
I printed it out onto card, double-checked the scale by measuring the nut width, trimmed it down...
...and glued it to a sheet of 6mm MDF, using the existing straight edge of the material to make my work cutting it out a little easier.
To assist with the template cut-out I made a sanding drum, and a work table with a corresponding cut-out. It even has dust-extraction, courtesy of an old Dyson.
At this point a suitable donor bass appeared on Gumtree - a Precision copy by Westfield. It looked okay and it was very cheap.
I dismantled the bass, to discover that not only was the body made of plywood, but the neck pocket looked like this:
Not good. But the neck itself felt pretty good. I took off the tuners, and drilled the holes slightly larger to fit some dowel I had left over from another project. I cut the plugs much longer than required so I could manipulate them with mole grips without damaging the wood that would be going into the holes.
I offered up a replacement nut I'd bought - the spacing and width were good, but it was a couple of mm too shallow. Another approach would be required.
Whilst waiting for the glue to cure, I cut and sanded the MDF headstock template to shape.
I also made a prototype bridge combining the P-Bass plate with Strat saddles. I could have used a hard-tail Strat bridge here, but the overall string spacing would have been too narrow, which would have resulted in the strings being pulled across the radius of the fretboard, making a decent setup difficult - the action would have to be pretty high to stop the strings choking.
With the glue cured, I trimmed the plugs flush.
And then sanded front and back.
Here's a paper headstock template showing how the knob at the top of the head will have to be moved bridgewards.
Not having a table saw, and it being critical to get this cut dead straight and square I clamped a straight edge in place to use as a guide for my oscillating saw.
With the cut made successfully, I used the paper template to position the off-cut section.
Using some more pieces of dowel and a workmate I made a jig to clamp the headstock for re-attachment.
With the glue cured, it looked like this:
At this point, Gumtree provided again. I wasn't keen on re-using the plywood P-Bass body, and a Jazz body / pickup configuration would have been my first choice, so when a sunburst Jazz copy came up locally for very little money I pounced on it.
On examination, it turned out that this bass actually had a 42mm width nut, as opposed to the 39mm that a Jazz would normally have. This gave me cause for pause, as it might have been better at this point to abandon the P-neck and instead re-shape the new neck. I decided to stick with the first neck for the following reasons;
- I'd already done several days work.
- I preferred the feel of the first neck - the one on the 'burst was chunkier than I like.
- If I messed up the first neck, I'd still have the other one for a second attempt.
So, back to the P Bass neck! I taped a paper template to the front of the headstock, and drilled two pilot holes for the low E and B tuners.
I drilled corresponding holes in the MDF template, and screwed it to the back of the headstock.
I trimmed the headstock roughly to shape with a saw so the router wouldn't have too much work to do.
I wasn't 100% confident that the glue joint in the headstock would withstand the stresses of routing, so I drilled a couple of 6mm holes through the grafted section into the main part of the head and glued in dowels to strengthen the joint. I forgot to take any pictures of this step, but the dowels can be seen in later images.
I ran the router around with a flush-cut bit, and ended up with this:
As you can see below, the router bit dug in a bit too much at the boundary of the hard maple and the softer dowels plugging the old tuner holes, resulting in a pretty rough edge. Filler and veneer would be required to make this good. New tuner holes have been drilled.
Some maple veneer was obtained, and front and back pieces were cut roughly to shape using the MDF template as a guide. A cut-off strip would also be used to cover the top edge of the headstock.
The old screw holes and sundry imperfections were filled and sanded flush. In the picture below you may be able to make out the 6mm dowels I put in to re-enforce the graft before routing.
The strip along the top edge was fitted first.
Next, the piece on the reverse of the head was glued on.
When the glue set, it was trimmed and sanded to shape, and the tuner holes gently opened up with a small grinder bit in a Dremmel-ish rotary tool.
Finally the front piece was attached. This was the trickiest veneer to affix, as it required heating with steam in order to bend it to the contours of the head around the truss-rod adjuster, and I had to make a clamping block which matched those contours in order to apply even pressure when gluing it up. Unfortunately you can't really make it out in this picture due to the many clamps.
When all was set, I trimmed it and opened up the tuner holes as I had on the back. I also had to open up the hole for the truss-rod adjuster.
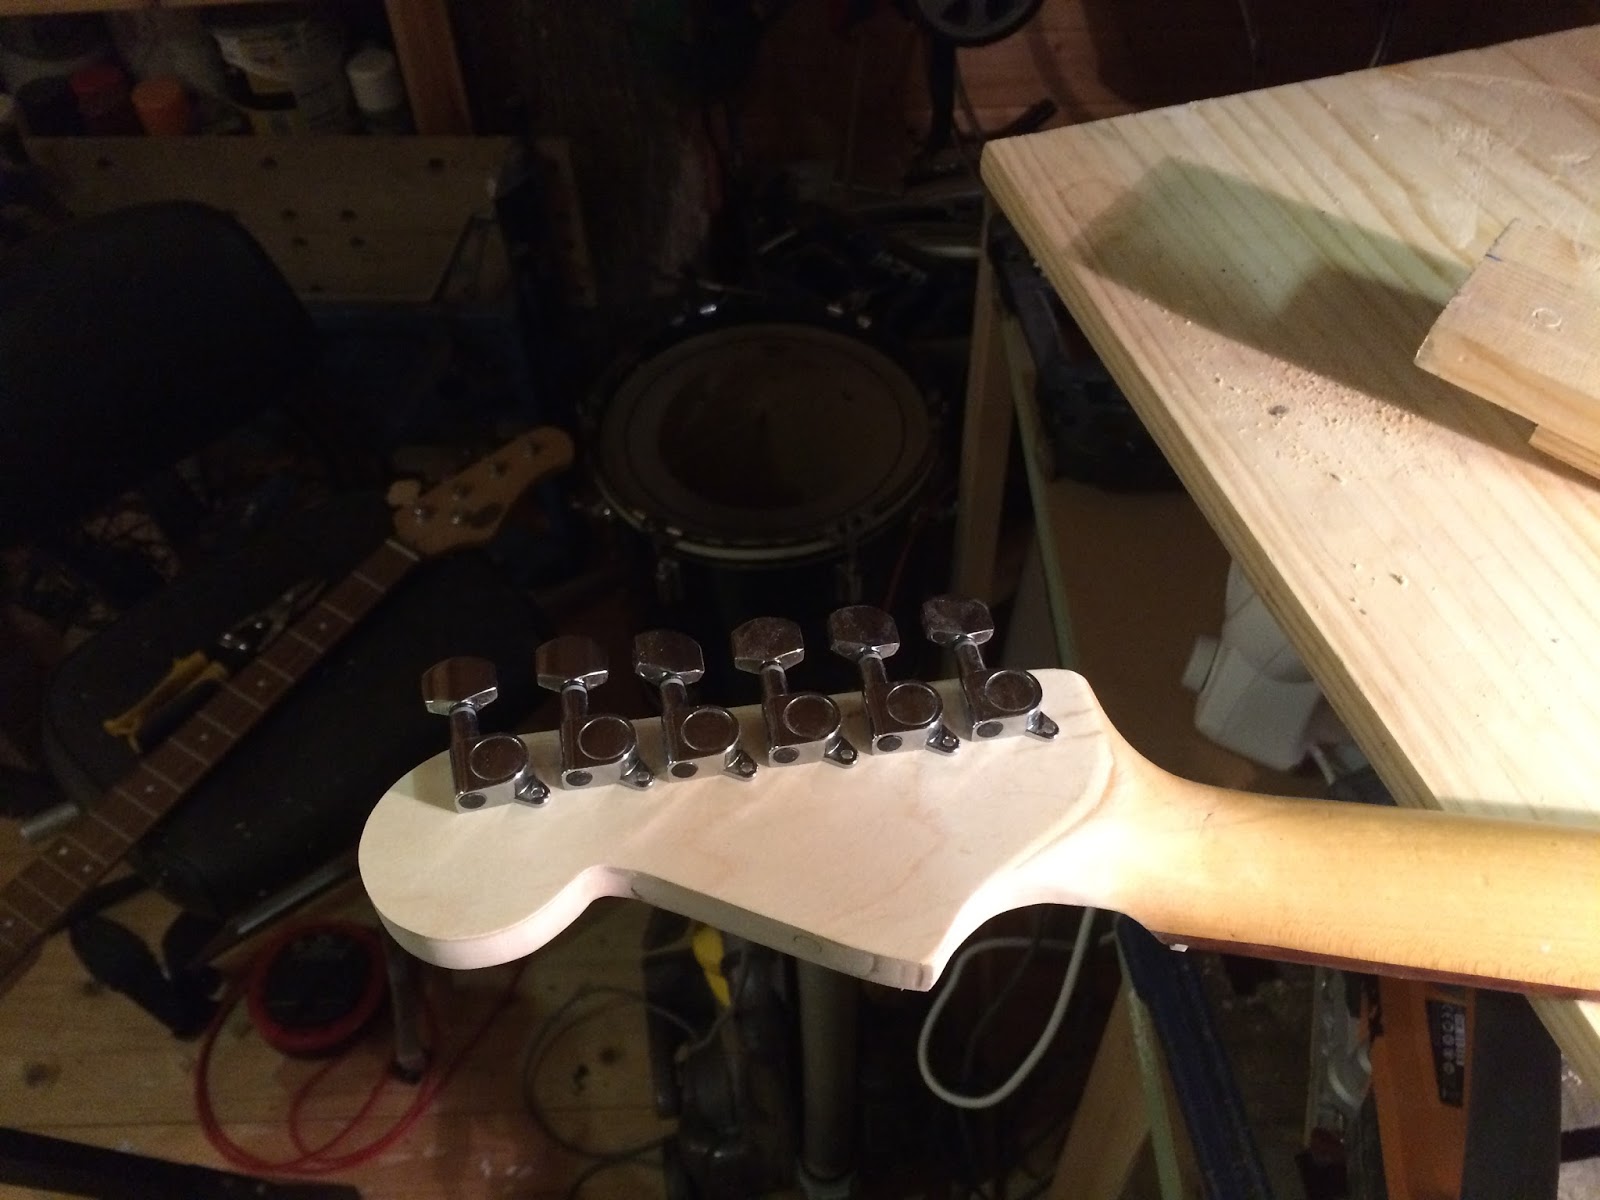
I test-fitted the tuners...
...and began to get an idea of what the finished article would look like.
I decided to use the existing nut rather than wait for a blank to be delivered, so I masked off both sides with tape and filled the existing slots with two-part epoxy.
Whilst I was waiting for this to harden I turned my attention back to the bridge. I made a new plate for the saddles to anchor to, and bolted it to the existing bridge plate using the holes which had previously been the anchor points for the A and D strings. Next I made a template with the computer which showed me where to drill holes in the bridge for through-body stringing.
These are at an angle (estimated by measuring other basses) to compensate for decreasing string gauge and hopefully allow for correct intonation.
And here is the new bridge assembled and installed.
A six-string bridge and a six-string head:
I was at the stage now where the neck could be attached. The neck pocket on the J body was slightly wider than that on the P, so a couple of brass shims were added to make it snug. You can probably make out the one on the bass side of the pocket in the photo below.
The now-filled nut, marked up ready to cut the new slots. You can see here that the veneer around the end of the fingerboard is looking a bit ragged. If the bass functions as I hope I'll sort this out when I come to refinish the neck.
The first string goes on...
And here it is fully assembled. The strings are a real mixed bag: The E, A & D were on the sunburst bass when I got it, but the E was clearly a replacement as it didn't match the other two. The D, G and high E are taken from a 30 " Kalium Bass VI set. Unfortunately the lower three strings from this set wouldn't fit because they started to taper down before they passed through the nut. As luck would have it I'd kept the old strings, and they seemed to be in almost new condition so they were a good match tonally for the Kaliums. Overall the gauges are approximately .023-.100.
I had planned to fit at least one string tree for the B and E, but with the strings on there was more than ample tension to keep them all in place without one, so I didn't bother.
You might be able to tell in the picture below that the string spacing is slightly off on the bottom three strings. This is because the epoxy in the nut wasn't quite as hard as I'd thought, and the E and D strings had been slowly pushing it aside and following instead the underlying E and A slots. When the concept has been proved I'll get a bone or Tusq blank and make a proper nut. I'm going to space it for equal gaps between the strings, rather than equal centres, which will hopefully make things a bit less crowded at the bottom end.
Pickups and wiring are stock for the time being, but this will probably change at a later date as the pole-piece spacing is now off, to the point where the A and B strings are slightly quieter than the others. I might get some rail-type pickups, or I might try introducing additional pole-pieces to the existing pups - if they're ceramic types I might be able to squeeze some more in.
Circuit-wise I originally envisaged having three pickups, with on-off-on DPDT switches for in- and out-of-phase sounds, but having played it through a couple of amps I'm pretty happy with the range of available tones. What I may do at some point is replace one of the volume controls with a push-pull pot to invert the phase of one of the pickups, and maybe another controlling a Jaguar-style strangle circuit. That will give a broad range of sounds without having any extra toggle switches cluttering the layout.
Next to Andy Zaardvark's Squier VI, for comparison.
I was surprised to find that they're pretty much exactly the same size - the Jazz VI feels much larger when you're playing it due to the wider fret-spacing.
Andy trying it out in rehearsal. It hadn't been set up at this point - I just wanted to hear it through a bass amp and get some feedback from Andy. Initial impressions were that it sounded awesome (growly, but tight in the bottom end and clear and defined up high), but was very hard work to play in comparison to the Squier.
UPDATE AUG 2017:
Having lived with the big VI for a few months, I overhauled it, making the following changes:
Neck - I made a bone nut to replace the plastic/epoxy stopgap. The only blank my local music shop had in stock was a huge one for a classical guitar bridge, so this took a lot of work and smelled absolutely terrible. It's a huge improvement, so worth the time and effort.
I also sanded the remainder of the original finish off the neck and left it as bare wood, just because I prefer the feel.
Bridge - I came to realise that I'd miscalculated the ideal position for the string-through holes in the bridge and body, meaning that I didn't have quite enough travel in the saddles to get all the strings correctly intonated. To fix this I made a new bridge plate from steel angle with the string-through holes further from the neck. The original holes through the body had been enlarged at the back to accomodate washers which served as ferrules to anchor the string ends. These were plugged with hickory cut from broken drumsticks, and new holes drilled to match the new bridge. The back of the guitar looked pretty horrible after this remedial surgery, so I covered it over with the tremolo cavity plate from a strat.
I also attempted to make some brass saddles of the correct width for the wider-than-a-Strat string spacing, but the tools I have weren't of a high enough tolerance to produce a satisfactory result.

Pickups - the original Jazz pickups didn't sound bad, but the poor alignment of strings and pole-pieces meant the output level was very inconsistent. I also had a hankering to install a third pickup in the neck position, so I started experimenting with some cheapo ceramic strat pickups I had floating around. After a while I'd assembled a mixed bag of pickups with the correct impedances and pole spacings to do what I needed. I routed a new cavity and cable channel for the neck pickup, and made a new pickguard with holes of the right size and shape. The neck and middle pickups have flat black covers, partly as a nod to the Fender Mustang, and partly because they didn't match that closely. The bridge pickup is a hot rails knock-off, mounted in a piece of 3-ply plastic that I shaped to vaguely resemble a Jaguar / Bass VI switch plate.

Electronics - the circuit is very similar to the standard Jazz wiring, just with another pickup i.e. 3 volume controls and a master tone. The neck and middle pickups have push-pull volume pots that invert the phase when pulled out, meaning that any phase combination of the three pickups is possible. I was thinking about also having push-pulls on the bridge volume and tone controls for coil tap and low-cut respectively, but I didn't have the parts on hand when I assembled the circuit and I don't think I'd really gain much by adding them retrospectively. The phase options available offer a variety of thinned-out, twangy sounds already.

The output jack was relocated to the edge of the body, and in order to accommodate the push-pull pots the control plate had to be raised up slightly on a gasket made of recycled scratchplate plastic.
Everything got shielded with aluminium tape, and I discovered that it also makes a great material for shimming necks if layered up - much more precise than the brass I used previously.
I think it's just about finished now, there are some further refinements to make (saddles and pickups custom made to suit the non-standard string spacing) but this instrument is fully functional in its current form.
And I've started work on the next one!